
In this tutorial I will show the procedure to install Raspbian on a microSD for Raspberry.
What we will need
First of all we need to download the image of the version we are interested in. In this case, for purely illustrative purposes I preferred to use the Raspbian Buster desktop full version, that is the Raspbian desktop with a suite of preinstalled software; this will make it easier to appreciate the distribution.
Procedure to install Raspbian on a microSD
The installation procedure can change depending on the operating system you use and also depending on the memory writing software. In this article we will show the procedure to prepare the microSD device on Windows, on Linux and on OS X. If you are using Windows, to write the image to the microSD you will need to download the Win32 Disk Imager utility from launchpad.net or from sourceforge.net, while on Linux and OS X you can natively use the dd command.
For this purpose you’ll also need a microSD of at least 8 GB, preferably 32 GB.
Procedure to create a microSD on Windows
- Insert the microSD into the reader on the Windows PC, tell the Win32 Disk Imager software the identifier of the USB device to write to (for example “F:”).
- Choose the Raspbian ISO file to write; in my case 2019-09-26-raspbian-buster-full.img.
- Click the “Write” button.
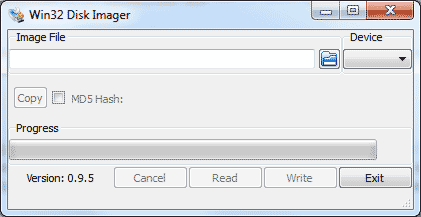
Once the write is complete, safely eject the drive from the Windows computer. You can now use the microSD on the Raspberry to boot the system.
Preparing a Raspbian microSD in a Linux environment
Creating a microSD in a Linux environment is quite simple. After downloading and verifying your ISO file, you can write your microSD using the following procedure. Remember that you must run the commands as root or you can use the sudo command to obtain the necessary permissions. Be careful which device you start the write process on because it is irreversible and you will lose all data stored on the device. To do this I recommend first identifying the device, so initially run, in a terminal window, the command without the microSD inserted.
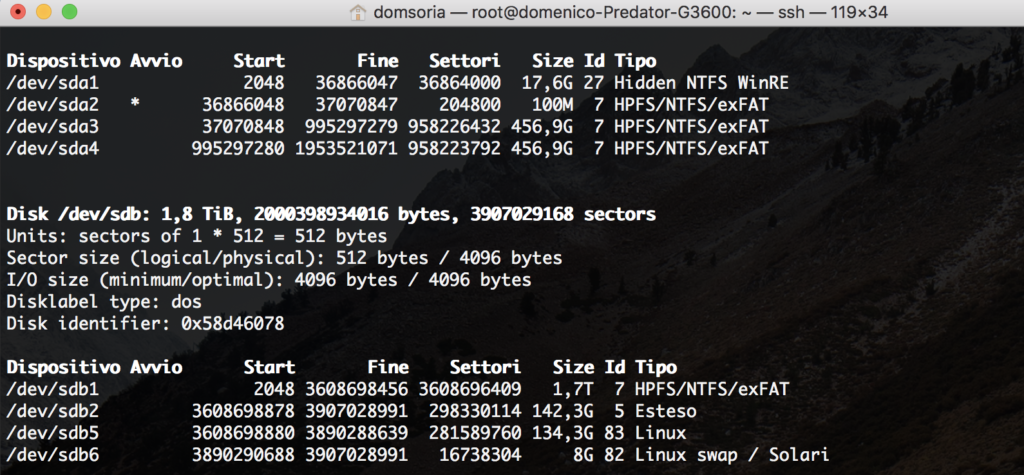
sudo fdisk -l
You will get an output that will look more or less like this; it depends a lot on your system configuration and connected devices, such as hard disks or other mass storage units. In any case you will certainly find the identifier – “/dev/sda” – containing the partitions (/dev/sda1, /dev/sda2 …) if you have a standard configuration. In my case /dev/sdb also exists because I have two disks. This information is useful for comparison later when we insert the microSD.
Insert the microSD into the reader and run the same command “sudo fdisk -l” a second time. The additional information you find compared to the first command will be what you need to proceed with the Raspbian installation.
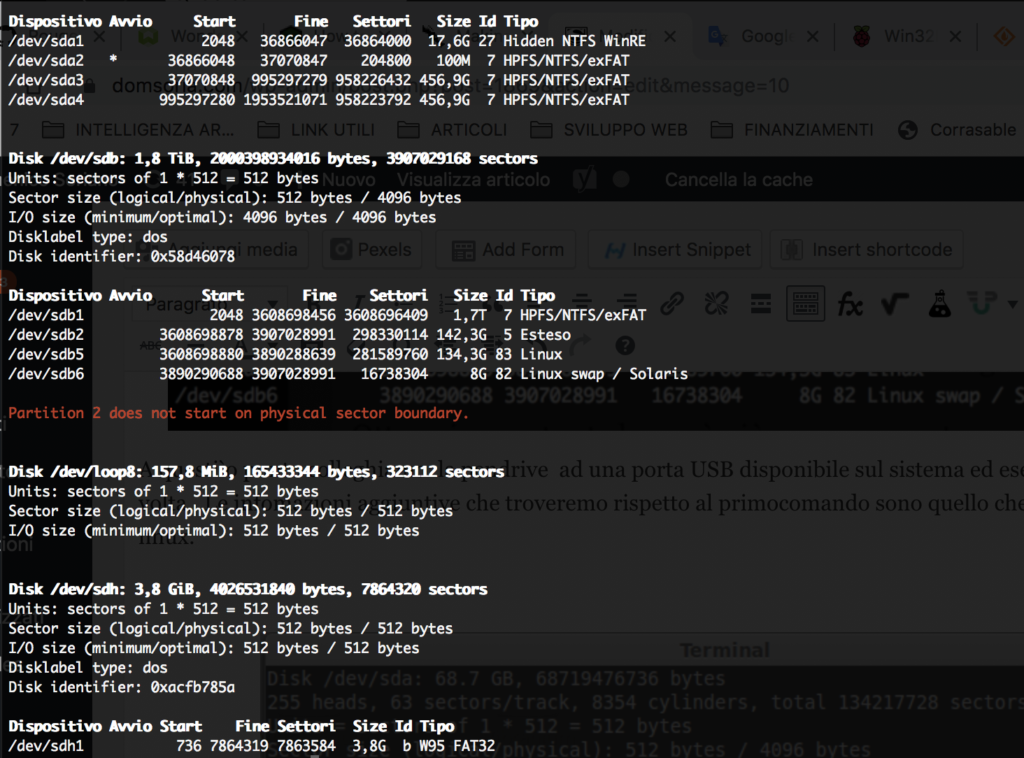
In this case we can say for certain that our microSD is connected to the device /dev/sdh1. Proceed with caution. Assuming the ISO file you downloaded is named “2019-09-26-raspbian-buster-full.img” and is located in the /tmp directory, run the following command:
sudo dd if=/tmp/2019-09-26-raspbian-buster-full.img of = /dev/sdh bs = 512k
Writing the image can take a long time, so be patient and because the dd command does not provide feedback do not interrupt the write. At the end of the process something like this should appear:
6496+0 records in
6496+0 records out
6811549696 bytes transferred in 417.232158 secs (16325563 bytes/sec)
Now you can insert the microSD into the Raspberry to boot the system.
Preparing a Raspbian microSD in an OS X environment
The procedure to create a microSD is not very different from Linux, if only because OS X is a UNIX-based system. Let’s review the steps to take. Again, I urge you to be careful which device you start the write process on because it is irreversible and you will lose all data on the device if you choose the wrong unit. Start as before by identifying the devices available on the computer. First run, in a terminal window, the following command without the microSD inserted.
diskutil list
A list of available devices will be displayed (similar to /dev/disk0, /dev/disk1, etc.), that is the list of disks mounted on the system, along with partition information for each of the disks.
bash-3.2# diskutil list

/dev/disk0 (internal):
   #:                       TYPE NAME                    SIZE       IDENTIFIER
   0:      GUID_partition_scheme                         251.0 GB   disk0
   1:                        EFI EFI                     314.6 MB   disk0s1
   2:                 Apple_APFS Container disk1         250.7 GB   disk0s2
/dev/disk1 (synthesized):
   #:                       TYPE NAME                    SIZE       IDENTIFIER
   0:      APFS Container Scheme -                      +250.7 GB   disk1
                                 Physical Store disk0s2

   1:                APFS Volume Macintosh HD            212.7 GB   disk1s1
   2:                APFS Volume Preboot                 21.9 MB    disk1s2
   3:                APFS Volume Recovery                519.6 MB   disk1s3
   4:                APFS Volume VM                      5.4 GB     disk1s4
Insert the microSD into a slot of your Apple computer’s reader and run the diskutil list command a second time. The microSD device path is most likely the last in the list. In any case, it will not have been present in the previous list.
bash-3.2# diskutil list

/dev/disk0 (internal):
   #:                       TYPE NAME                    SIZE       IDENTIFIER
   0:      GUID_partition_scheme                         251.0 GB   disk0
   1:                        EFI EFI                     314.6 MB   disk0s1
   2:                 Apple_APFS Container disk1         250.7 GB   disk0s2
/dev/disk1 (synthesized):
   #:                       TYPE NAME                    SIZE       IDENTIFIER
   0:      APFS Container Scheme -                      +250.7 GB   disk1
                                 Physical Store disk0s2

   1:                APFS Volume Macintosh HD            212.7 GB   disk1s1
   2:                APFS Volume Preboot                 21.9 MB    disk1s2
   3:                APFS Volume Recovery                519.6 MB   disk1s3
   4:                APFS Volume VM                      5.4 GB     disk1s4

/dev/disk2 (external, physical):
   #:                  TYPE NAME                        SIZE       IDENTIFIER
   0:     Apple_partition_scheme                        *31.9 GB    disk2
   1:        Apple_partition_map                         4.1 KB     disk2s1
   2:                  Apple_HFS                         5.1 MB     disk2s2
In this example, you can see that there is now /dev/disk2 which was not previously present. Unmount the drive (assuming, for this example, that the microSD corresponds to /dev/disk2) by running the command:
diskutil unmount /dev/disk2s1
Now proceed with caution. Assuming the ISO file you downloaded is named “2019-09-26-raspbian-buster-full.img” and is located in the /tmp directory and that the USB device is /dev/disk2, run the following command:
sudo dd if=/tmp/2019-09-26-raspbian-buster-full.img of=/dev/disk2 bs=1m
Note: increasing the block size (bs) will speed up the write progress, but it will also increase the chances of creating a faulty microSD. Using the value chosen on OS X produced working images.
Writing the image can take a long time, so be patient and because the dd command does not provide feedback do not interrupt it. At the end of the process something like this should appear:
6496+0 records in
6496+0 records out
6811549696 bytes transferred in 417.232158 secs (16325563 bytes/sec)
Now it’s time to insert the microSD into your Raspberry and use it.
Comments