
What is WebRTC and how does it work
In this series of articles, I will try to explain how to enable real-time communication over the web using WebRTC and I will also share some examples to practically dive into the protocol. Before starting with the more technical explanation, I want to clarify that although the WebRTC protocol is known for audio/video communications, it is actually a very powerful and more general tool for simply exchanging data between two peers.
What is WebRTC
WebRTC, an acronym for Web Real-Time Communication, is an open-source project that allows a web browser and/or mobile applications to communicate in real time using API (Application Programming Interface). It ensures audio/video connection within web pages/webviews, enabling peer-to-peer communications without the need for additional plugins.
The WebRTC protocol is widely supported by major browsers and has been standardized by the World Wide Web Consortium (W3C) and the Internet Engineering Task Force (IETF).

As mentioned, WebRTC allows peer-to-peer communication, but to work, it still needs one or more supporting servers to handle the various communication phases and to allow clients to:
- exchange metadata and coordinate communication between clients (signaling)
- manage communication through firewalls.

The signaling server plays a very important role because the signaling mechanism is essential for the proper management of a WebRTC connection. It is responsible for coordinating the communication and allowing a WebRTC application to establish a call. The signaling process manages the entire lifecycle of a call and allows the exchange of information such as:
- Control messages to open and close communication
- Error messages
- Metadata about media characteristics, such as codec, settings, bandwidth, type of media (audio/video)
- Data for establishing secure connections
- Network data such as the IP address of the peers and the socket ports
In a WebRTC connection, other servers like TURN and STUN can also be involved, especially to address network and peer visibility issues arising from the use of NAT or the presence of Firewalls.
How does it work?
Let’s try to understand the various phases to initialize a WebRTC connection and which entities will be involved in the various steps.
As mentioned earlier, to establish a connection, the two clients will first have to connect to a signaling server that will allow the two peers to get in touch. The initialization and termination of the call are determined by signaling messages exchanged with the server using HTTP or WebSocket protocols, while the content exchange will take place directly between the clients without the assistance of intermediate servers, unless the two clients are not directly visible. In that case, it will be necessary to use an intermediate server like TURN. It’s important to remember that the signaling protocol between the client and the server is not standardized in WebRTC, so the implementation has been left to the application and is freely available for the designer to use.
Before the two peers can start exchanging data with each other via WebRTC, they need to exchange preliminary information through the signaling server, necessary for negotiation and detecting the format and media.
This is done using the following protocols:
- Session Description Protocol (SDP) which is used to provide multimedia content metadata such as resolution, encoding, bitrate, etc.
- Interactive Connectivity Establishment (ICE) is used to establish a peer-to-peer connection.
| Note: In cases where the two peers are not on the same network, it will be necessary to use a STUN server (Session Traversal Utilities NAT) to obtain the public address of the peers. If either of the networks is protected by a firewall, then the use of a TURN server (Traversal Using Relays NAT) would become mandatory. |
Let’s assume, for understanding purposes, a general case where the two peers are protected by Firewalls and are not on the same network. Furthermore, I will take for granted, for the following description, that the two peers have already established a WebSocket connection with the signaling server.
Below is a typical WebRTC flow:
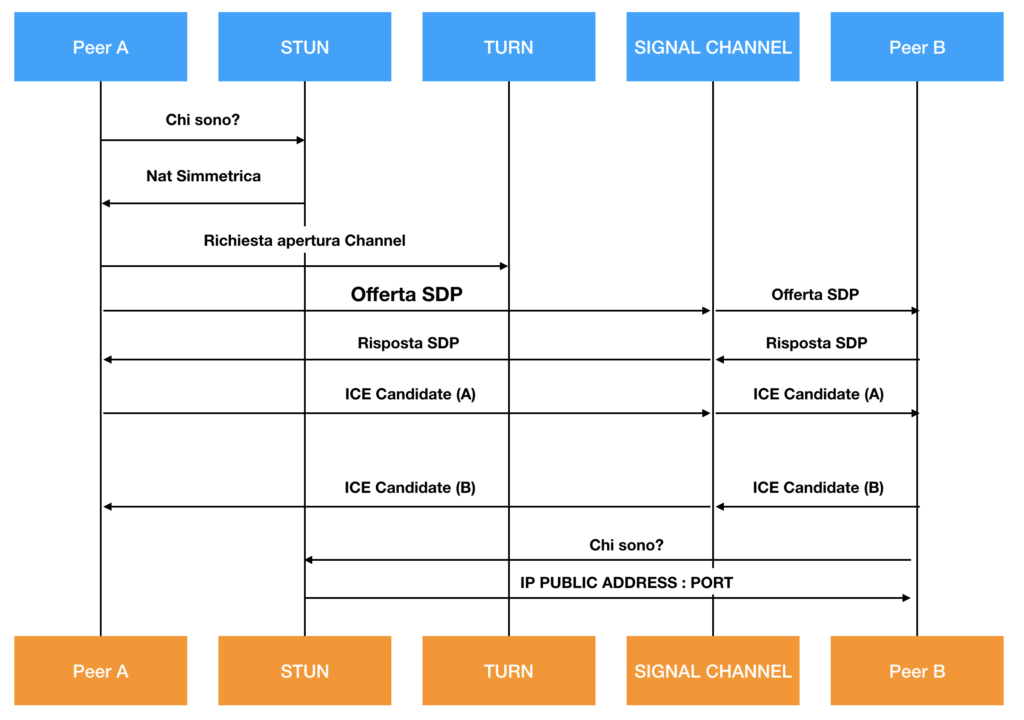
At this point, I will try to delve deeper into the entities involved in the process, providing some definitions and general explanations, hoping to be as comprehensive as possible.
What is STUN
As mentioned, the use of STUN is necessary when the two peers are not on the same network and are on natted private networks. A STUN server, in fact, will allow clients behind NAT to properly set up WebRTC calls outside the local network and has the task of providing the clients with some information, such as their public address, the type of NAT they are behind, and the side of the internet port associated by the NAT with a particular local port. This information is used to set up communication between the peers. The STUN protocol is explained in RFC 3489.
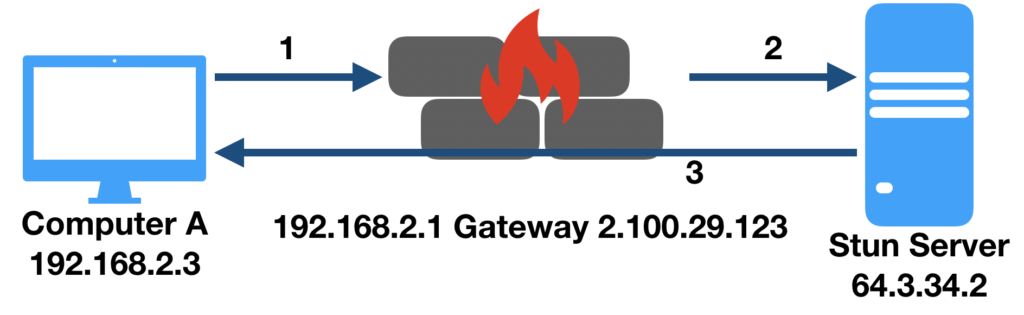
What is NAT
NAT (Network Address Translation) is a mechanism that allows masking private network addresses on a public network and is implemented on the gateway to allow a host with a private network address to communicate with hosts on a public network (internet). NAT is explained in RFC2663, RFC1631
What is TURN
Since most WebRTC applications generally need to use a server to forward traffic between peers, as they often are not in direct contact (unless they reside on the same local network). To solve this problem, you can use a TURN server (Traversal Using Relay NAT) that effectively implements a protocol for forwarding network traffic.
There are currently several options for using TURN servers. There are, in fact, available online, both as self-hosted applications (like the open-source COTURN project) and as cloud-provided services.
Once a TURN server is identified/installed, all that’s needed is the correct RTCC configuration so the client application can use it. The following code snippet illustrates an example configuration for RTCPeerConnection where the TURN server is named host my-turn-server.mycompany.com and runs on port 19403.
const iceConfiguration = {
    iceServers: [
        {
            urls: 'turn:my-turn-server.mycompany.com:19403',
            username: 'optional-username',
            credentials: 'auth-token'
        }
    ]
}

const peerConnection = new RTCPeerConnection(iceConfiguration);
WebRTC API
Below I list the main APIs provided by the WebRTC protocol of which I will try to explain the meaning and how to use them:
- getUserMedia: captures audio and video media, allowing access to the camera and microphone of the PC or smartphone.
- RTCPeerConnection: enables audio/video connection between peers. This method handles encoding and decoding, peer-to-peer communication, security, and bandwidth management.
- RTCDataChannel: allows bidirectional data communication between peers through a low-latency WebSocket connection.
- getStats, which allows the application to gather a set of statistics related to the active session.
getUserMedia
The Media Stream APIs (also known as getUserMedia) allow, with the user’s consent, to access the video stream from the webcam and the audio stream from the microphone on the device currently in use.
Using getUserMedia is very straightforward:
<html>
  <head>
 </head>
  <body>
    <div id="Container">
            <video autoplay="true" width="640" height="480" id="videoElement"></video>
            <input type="button" id="start" Value="START"  />
    </div>
  </body>
</html>
<script>
jQuery(document).ready(function(){
     jQuery("#start").click(function () {
startVideo();
})
})
    function startVideo() {
        var video = document.querySelector('video'),canvas;
        imageElement=video;
        console.log("navigator  " + navigator.mediaDevices)
        if (navigator.mediaDevices) {
           // access the web cam
            navigator.mediaDevices.getUserMedia({ video: true })
                // permission granted:
                .then(function(stream) {
                 //video.src = window.URL.createObjectURL(stream);
                     video.srcObject = stream;
                })

                // permission denied:
                .catch(function(error) {
                    document.body.textContent = 'Could not access the camera.Error:' + error.name;
                });
        }
        return imageElement;
    }
</script>
Live Demo
Connection Activation
At this point, the procedure to obtain a video stream from a camera using getUserMedia should be clear, so we can move on and understand how to forward the stream to a remote peer. In this regard, we need to understand how a typical WebRTC connection works and first delve into:
RTCPeerConnection
The function of RTCPeerConnection is to connect two devices in a peer-to-peer mode. The procedure that allows us to achieve this connection is as follows:
Given two devices, A and B. Assuming A wants to contact B to open a peer-to-peer channel:
- A will have to create an RTCPeerConnection object and will have to listen for the onicecandidate event that will be returned by B.
- A will have to communicate to B the unique identifier of its own peer-to-peer channel when it receives the onicecandidate event.
- B will have to use the addIceCandidate method on its own RTCPeerConnection object to add A as the recipient.
- A will have to invoke createOffer to generate an SDP (Session Description Protocol) string that will have to be sent to B. The SDP will describe the constraints on the audio/video stream (codec, etc.) of the device.
- B will receive A‘s SDP string and will generate an SDP response using the createAnswer method, which will be sent to A.
- Both A and B will receive the addstream event that will contain the data stream of the partner, and they can decide to upload it to a video element as seen in the previous example.
Let’s review the flow from an operational point of view:
Step 1: Create an instance of the RTCPeerConnection object that will use STUN servers to address NAT issues.
Step 2: Once the RTCPeerConnection is created, three callback functions (onIceCandidate, onNegotiationNeeded, and onAddStream) must be implemented and assigned to RTCPeerConnection.
Step 3: Create onIceCandidate. This event handles the STUN server’s responses to your client regarding NAT/Firewall traversal. Therefore, you will need to create a function that accepts an RTCIceCandidate object.
Step 4: Create onNegotiationNeeded. This event is triggered in case something happens that requires a new session negotiation.
Step 5: Create onAddStream. This event is called when you call setRemoteDescription with the SDP information or your remote peer. When this event is triggered, you can handle the video stream.
Adding the stream
To add a stream to the connection, you will first need to create it, and to do so, you will have to use getUserMedia which allows us to get the video stream from the camera or microphone. Keep in mind that getUserMedia can be invoked by passing constraints and returns a success or a failure.
Stream Addition
To add a stream to the connection, you first need to create it, and to do that, you need to use getUserMedia that allows you to get the video stream from the camera or microphone. Note that getUserMedia can be invoked by passing constraints and returns a success or failure.
        if (navigator.mediaDevices) {
           // access the web cam
            navigator.mediaDevices.getUserMedia({ video: true })
                .then(function(stream) {
                     .
                     .
                     addStream(stream);
                     console.log( 'stream ok');

                })
                .catch(function(error) {
                     console.log( 'Could not access the camera.Error:' + error.name);
                });
Constraints are parameters that, for example, define whether the call is video, audio, or both. The size of the stream, the color of the transmitted images, any filters.
Success is an event that triggers if everything went well and in that case, you should have obtained the video session.
Failure is an event that triggers in case of device access error.

I am passionate about technology and the many nuances of the IT world. Since my early university years, I have participated in significant Internet-related projects. Over the years, I have been involved in the startup, development, and management of several companies. In the early stages of my career, I worked as a consultant in the Italian IT sector, actively participating in national and international projects for companies such as Ericsson, Telecom, Tin.it, Accenture, Tiscali, and CNR. Since 2010, I have been involved in startups through one of my companies, Techintouch S.r.l. Thanks to the collaboration with Digital Magics SpA, of which I am a partner in Campania, I support and accelerate local businesses.
Currently, I hold the positions of:
CTO at MareGroup
CTO at Innoida
Co-CEO at Techintouch s.r.l.
Board member at StepFund GP SA
A manager and entrepreneur since 2000, I have been:
CEO and founder of Eclettica S.r.l., a company specializing in software development and System Integration
Partner for Campania at Digital Magics S.p.A.
CTO and co-founder of Nexsoft S.p.A, a company specializing in IT service consulting and System Integration solution development
CTO of ITsys S.r.l., a company specializing in IT system management, where I actively participated in the startup phase.
I have always been a dreamer, curious about new things, and in search of “new worlds to explore.”

Comments